Power of hybrid (I): add flutter to existing apps
UPDATED: Updated for Flutter v1.9.1.
TL;DR: this guide gives a real example (which is a minimized version that comes from our real project) when you follow the Official wiki: Add Flutter to existing apps, covering some common issues you might have. Check out the full FlutterHybridExample in Github to see what it looks like when done.
Consider this situation, you have an app that works for both Android and iOS platforms, you developed them in a native way to get the best performance and user experience possible. Then one day you need to add a new feature to make it more attractive, which means the same thing has to be done twice, one for each platform. You heard of fancy and shinny stuff - Flutter that promises to work for both platforms and claims to bring native performance. But you can’t afford the time in totally rebuild the app, you still need to keep things running for existing users, just like doing an open heart surgery. So my answer is:
- Develop the new feature using Flutter
- Add the new Flutter module into existing native Android and iOS apps
- Write platform specific code in Flutter, and/or add bridging code to Flutter and/or native apps as required
For this approach to be productive:
- The new module should not rely too much on platform specific features
- The new module should not rely too much on communication with existing apps, e.g. calling methods from native app
Before starting, here are a few prerequsites:
- You have set up Flutter tool chain 1.9.1
- You have set up Android Studio IDE 3.5
Let’s get started.
1. Create a Flutter project
First we create a new Flutter project FlutterHybridExample/flutter_common_module as a sub-module in order to develop a new feature:
1 | cd FlutterHybridExample |
2. Android app
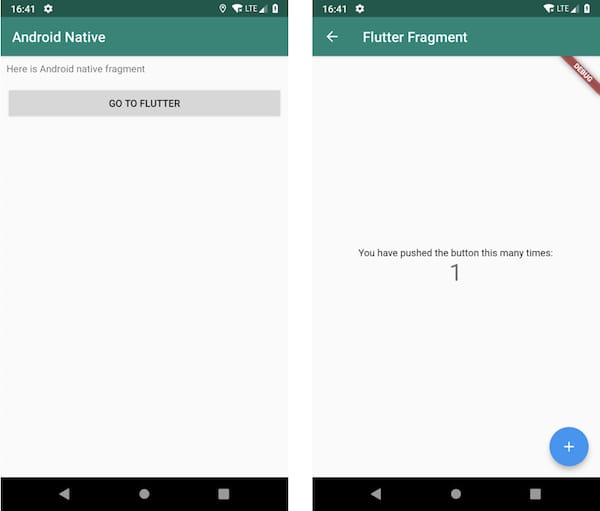
There’s an existing Android minimal app at FlutterHybridExample/android_native_app which represents our existing Android app. It has a TextView saying “This is Android native fragment” and a button labeled “GO TO FLUTTER” that does nothing at this stage.
2.1 Add denpendency on Flutter module
Here we use the option “Depend on the module’s source code” described in the official wiki. Edit file android_native_app/settings.gradle to include Flutter project as a sub-project, which will look like:
1 | include ':app' |
Then edit file android_native_app/app/build.gradle to add denpendency on Flutter module:
1 | implementation project(':flutter') |
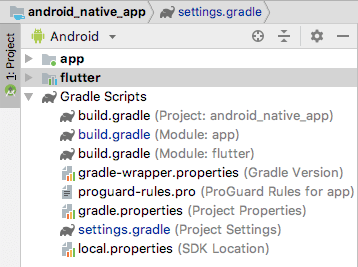
After a Gradle sync, you can see a new sub-project flutter in parallel with your existing main app module in Android Studio’s project panel (as picture shown below). When you add more dependencies to flutter project, you will see more sub-projects in your Android app.

2.2 Use Flutter module
You can use it in two ways, one is to create a FlutterView and display it the same way as any Android View, another is to use it as an Android Fragment. Because we need to register a MessageChannel later to enable calling Android methods at Flutter side, so it’s a bit easier to just use FlutterView.
Suppose we have an existing AndroidFragment that represents the existing Android app, now we are loading a new FlutterHostFragment which creates a FlutterView by calling Flutter.createView():
1 | class FlutterHostFragment: Fragment() { |
Then you can build and run the app in the same way building a normal Android one.

2.3 Hot reload
This is the best part of a dynamic language like Javascript where you can do hot reload that shows the changes to UI instantly. For the compiled languages like Java/Kotlin , even with partial compile and JVM hot bainary swap, it’s still a headache especially there is a long way to get to the screen that is changed.
Connect a device or launch an emulator. Then attach Flutter to the app by typing commands in terminal:
1 | cd FlutterHybridExample/flutter_common_module |
Then run the app in debug mode from Android Studio. Go to the Flutter screen by hitting button GO TO FLUTTER in the app. You should be albe to see output in the terminal:
1 | Done. |
After you make some changes to Dart code in flutter_common_module, type r key in the terminal, then you can see the changes instanly. You can also paste the URL above into your browser to use the Dart Observatory for setting breakpoints, analyzing memory retention and other debugging tasks.
3. iOS app
There’s another minimal app at FlutterHybridExample/ios_native_app which represents our existing iOS counterpart. It uses cocoapods for dependencies management.
3.1 Add denpendency on Flutter module
First add these two lines to your Podfile which calls a script to setup Flutter stuff:
1 | flutter_application_path = '../flutter_common_module' |
Then for each Xcode target that needs to embed Flutter, call install_all_flutter_pods(flutter_application_path) in the Podfile.
1 | target 'ios_native_app' do |
Then run pod install, you should be able to see pod output like this without any error:
1 | Analyzing dependencies |
3.2 Use Flutter module
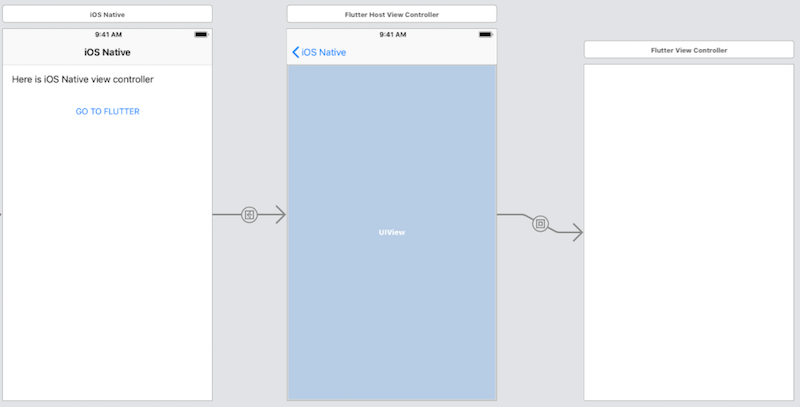
The way described in the official wiki (see reference 1 at the end of article) requires modifying AppDelegate to register additoinal Flutter libraries, which I don’t really like. Actually the FlutterViewController class wraps everything up pretty good, so the easiest way is to add a new ViewController in storyboard and set is as subclass FlutterViewController. No code is needed.
Here we add one more host FlutterHostViewController to embed the FlutterViewController to give a little bit more flexibility.

And we are all set, just run the app. Hot reload is the same as described in a previous chapter.
Build error
With Flutter 1.9.1 you might run into this build error in the final phase [CP] Embed Pods Frameworks, saying permission denied when signing file Flutter.framework:
1 | PhaseScriptExecution [CP] Embed Pods Frameworks |
According to a user replied in Flutter issue tracker, it can be fixed by adding a line chmod -R +w $1 to script ios_native_app/Pods/Target Support Files/Pods-ios_native_app/Pods-ios_native_app-frameworks.sh.
1 | code_sign_if_enabled() { |
